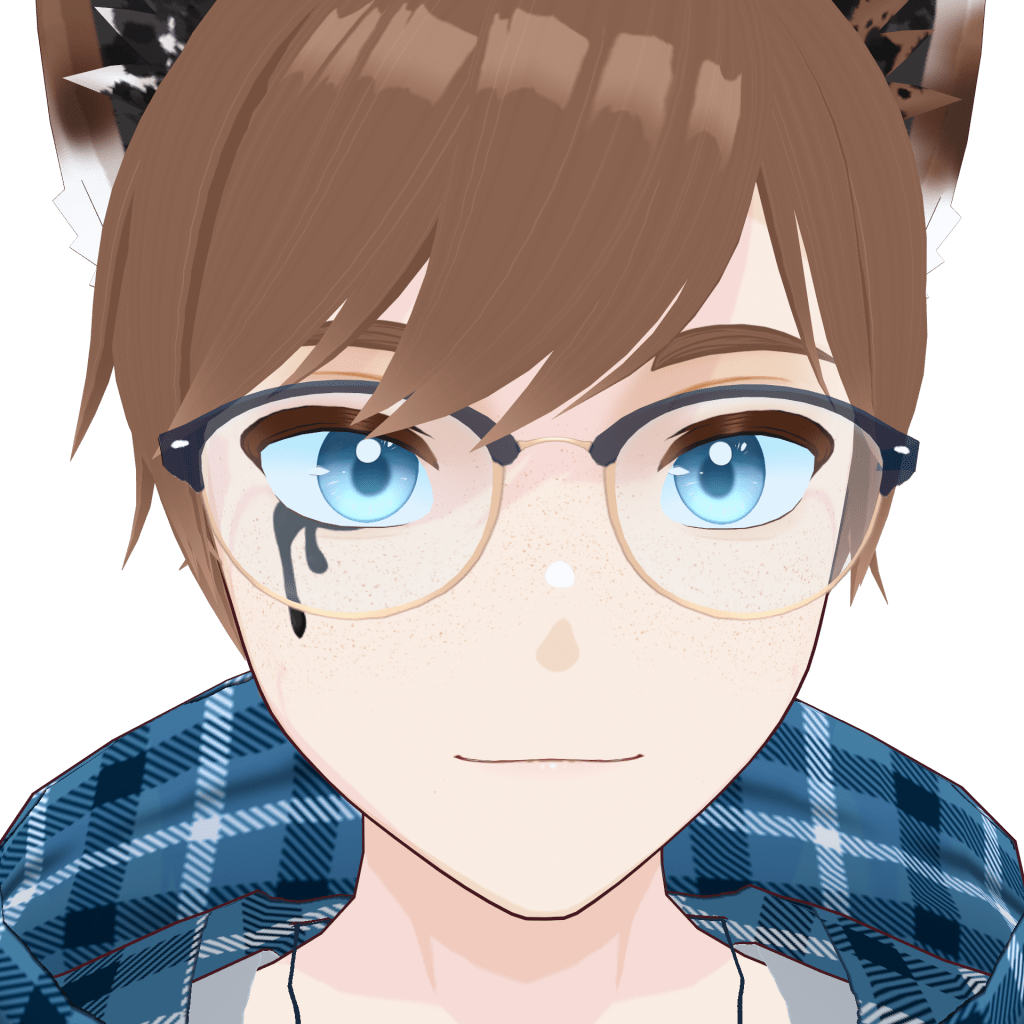
![Model Showcase: Chey [Inkrot Calico]](https://inkrotcalico.com/wp-content/uploads/2026/03/vtuber-model-showvase-chey-inkrot-calido.png?w=1024)
Hello, my lovely inkblots! Welcome to my first model showcase post, which features my own 3D VTuber model. A couple months ago, I finally showed off my new VTuber model, which I made using VRoid Studio, Unity, and Blender, on my YouTube channel, but I wanted to take the time to really go over my favorite and not-so-favorite parts of my avatar. Normally, this is the kind of thing I would make into a YouTube video or a short, but instead I am making a blog post because I don’t have time to work on videos right now.
Anyway, we’ll begin with my favorite parts of my model, then move on to the ones I want to improve. As always, suggestions are welcome in the comments, just make sure they are constructive.
Parts of my model that I love
The glasses (the frame)
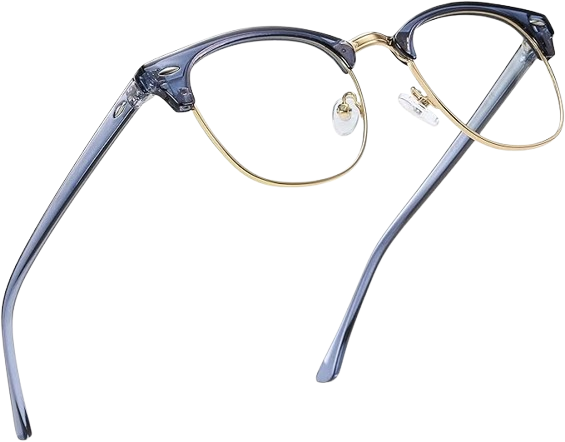
While I have made semi-transparent clothes and things on models in the past, I had a lot of fun making the frames for my model’s glasses. VRoid Studio doesn’t allow for semi-transparent textures natively, so this was something I had to sort out in Unity. Despite the extra work, I adore how they turned out and plan on adding fun things like charms and chains to them in my future designs. Also, these glasses are modeled after my actual computer glasses! I forgot to include the golden parts of the frame that show up underneath the blue parts, but I may add that detail at a later date as well. (I may need to get real glasses soon, so I hope I can find ones with similar frames in the future.)
The eyes (lines and irises)
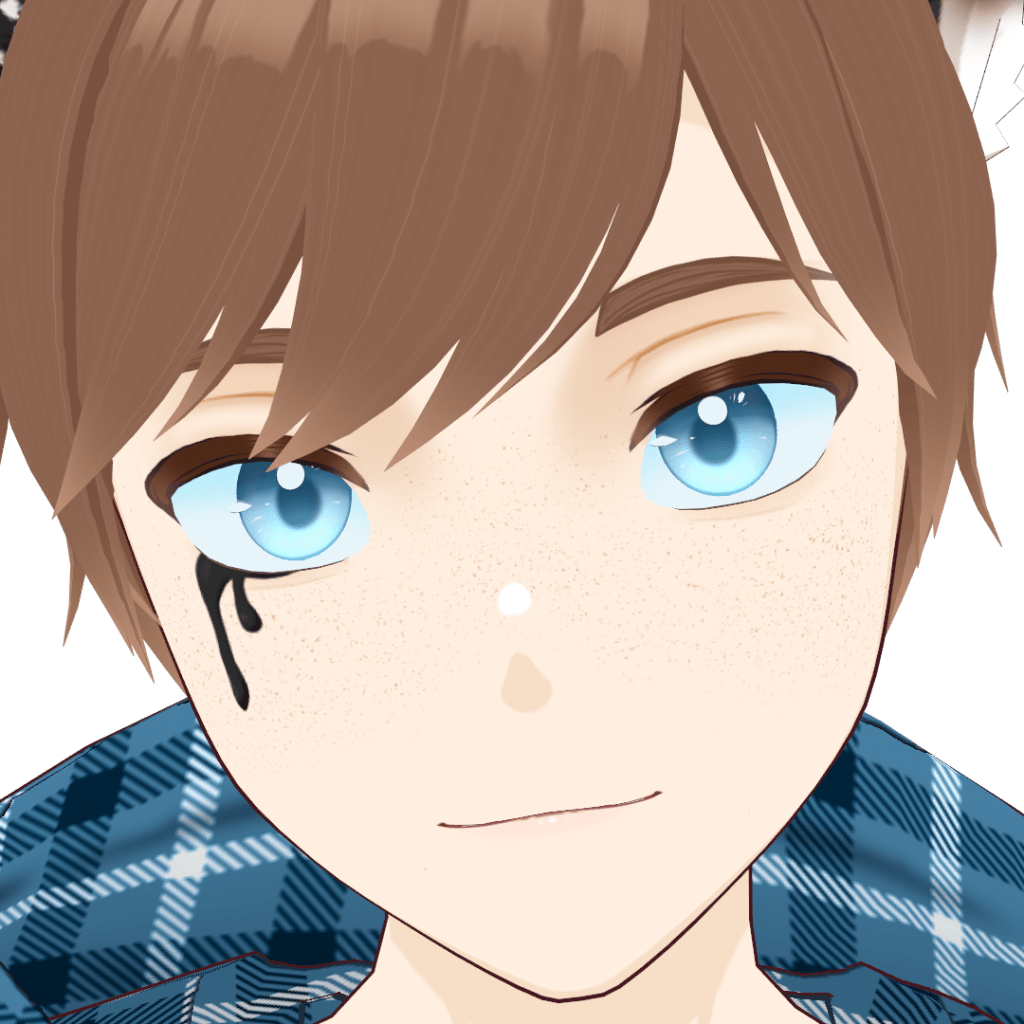
I mentioned this specifically in my video on how I made my VTuber model, but I love how the eyes turned out on my model, specifically the iris and the eyeliner textures. I ended up “painting” the irises in VRoid Studio and compiling all the layers into one PNG in Clip Studio Paint instead of remaking them because I liked them so much—and that’s unheard of for me.
The eyeliner, on the other hand, was sketched out in VRoid Studio and recreated in Clip Studio Paint, like my textures usually are. I used my usual lineart brush to create the brush strokes on the inside, and I love how it turned out because it reminds me of a sketch.
Ears & inkblot features
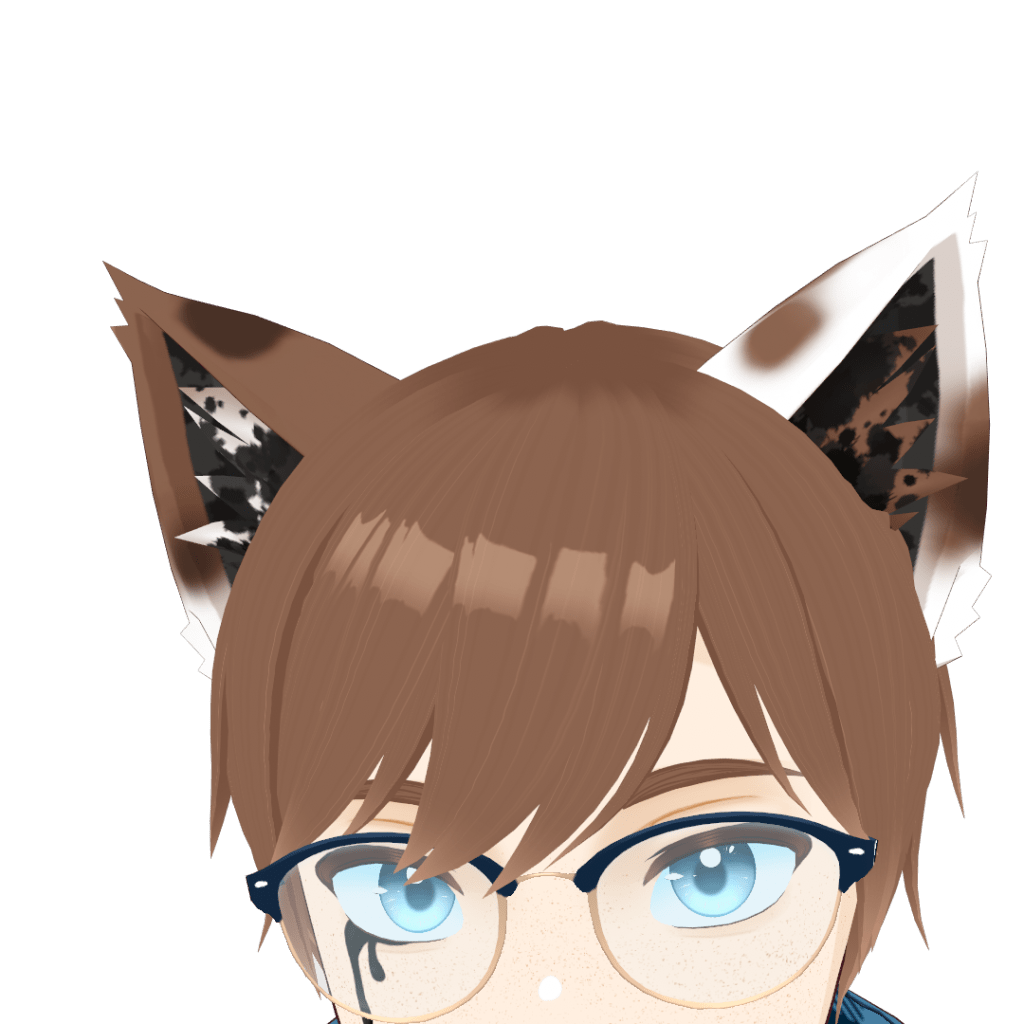
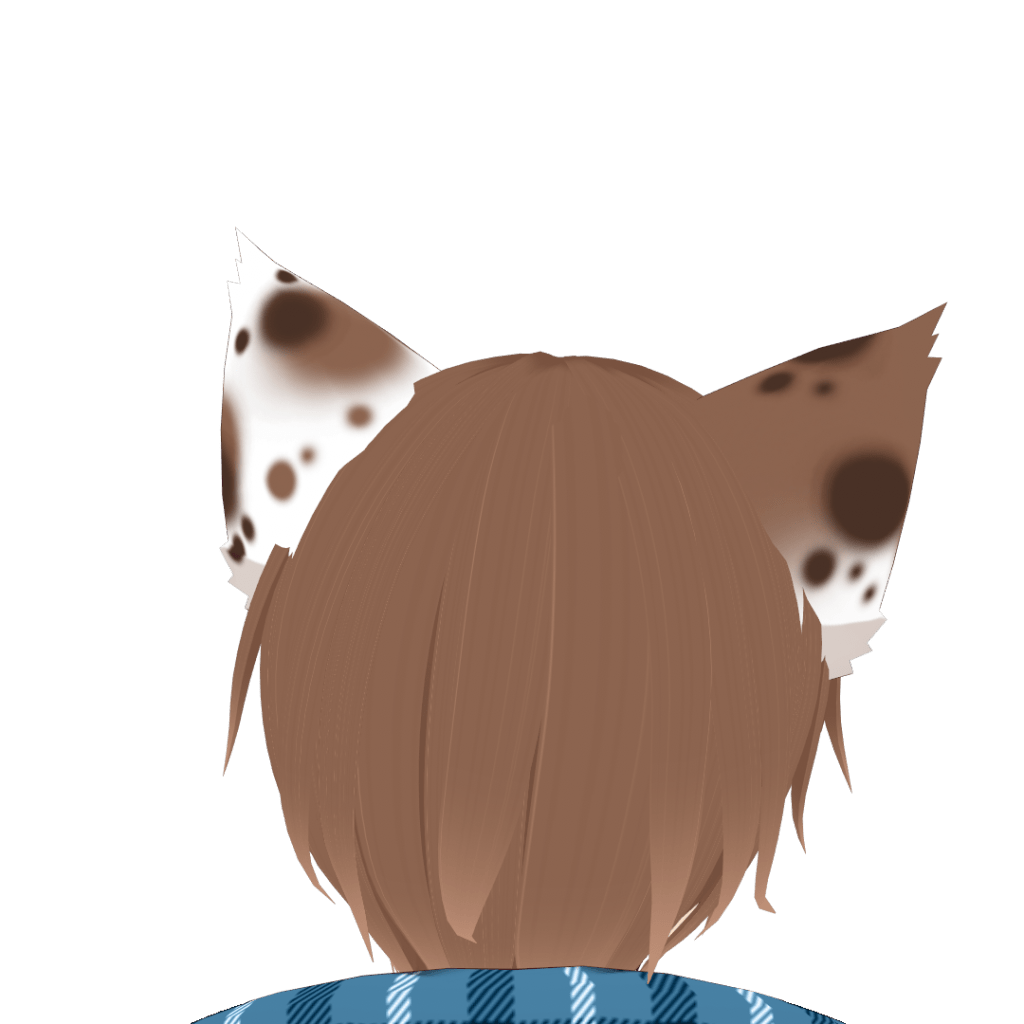
This is something that I borrowed from my old design and then took to the next level. When I was creating content under my pen name, I went through several designs, but after a certain point all of my designs had an ink motif to them. When I decided to shift from an elf model to a kemonomimi catboy model, I added inkblots to the inside of the ears and drips of ink coming out of the right eye. As you can see, I did the same thing here, but also added inkblots to the fur on the inside of the ears, which I think elevated the look of them overall. (It also helps that I referenced kemonomimi cosplay ears from a really cool seller on Etsy. I’m not sponsored, but I got myself a pair of ears and they are awesome!)
Ear rigging with eyebrow movements
(I am currently waiting for my GIF to get approved. If you’d like to see an example in the mean time, please see the end of this YouTube short.)
This was the part of my model that I was the most excited to show off. Over the summer, while I was trying to decide what to do with my content and writing, I ended up watching the debut of Sameko Saba. I ended up staying for the entire stream, and the whole time I was mesmerized by the expressiveness of her model. While I don’t work with Live2D (at least, not yet), I have a very basic understanding of how Live2D model rigging and facial capture technology works. So, the whole time I watched the stream, I stared at her model, watching how the ears moved, and came to a conclusion: her ears moved with her eyebrows, at least for some expressions.
I grabbed the nearest notebook and scribbled down what I thought, as well as a general idea for how I could potentially make this possible with my own models. I’ve heard of people weight painting parts of their models in Blender to make them move, but I still haven’t done it (it looks intimidating and tedious). I needed an easier way. With a lot of trial and error, I determined that I could achieve a similar effect by creating blendshapes for the ears.
By the end of the next day, I had figured out how to create the blendshapes to make the ears move, as well as apply them to my old model’s eyebrow blendshapes. By the time I finished my current model, I had already worked out the whole process. With my iPhone tracking, it works pretty seamlessly, considering nothing is actually animated. I may make a tutorial on how to do this in the future (there were none when I was figuring everything out), but I have seen people do similar things with their models recently. Overall, I am very happy with the result—I’m just sad I don’t have enough time to make videos to really show it off!
Parts of my model that I want to improve
Better expressions
As of writing this, I mainly use a Unity package called HanaTool to add ARKit blendshapes to my VRoid models, but this comes with some drawbacks. For one, it makes it where I have to work within the parameters that it sets to create the expressions for my model, which leads to some uncanny expressions. Honestly, while I did use Blender to add the ear movement, I need to use Blender more in the creation of my models to have more control over them. I’m tired of my model looking weird and borderline creepy when I smile in a way that shows my teeth.
I also want to learn how to make toggles for different skin textures to add to the expressions as well. We’ll see how far I get with all of that by the time I make a 2.0 model for myself.
Better clothes
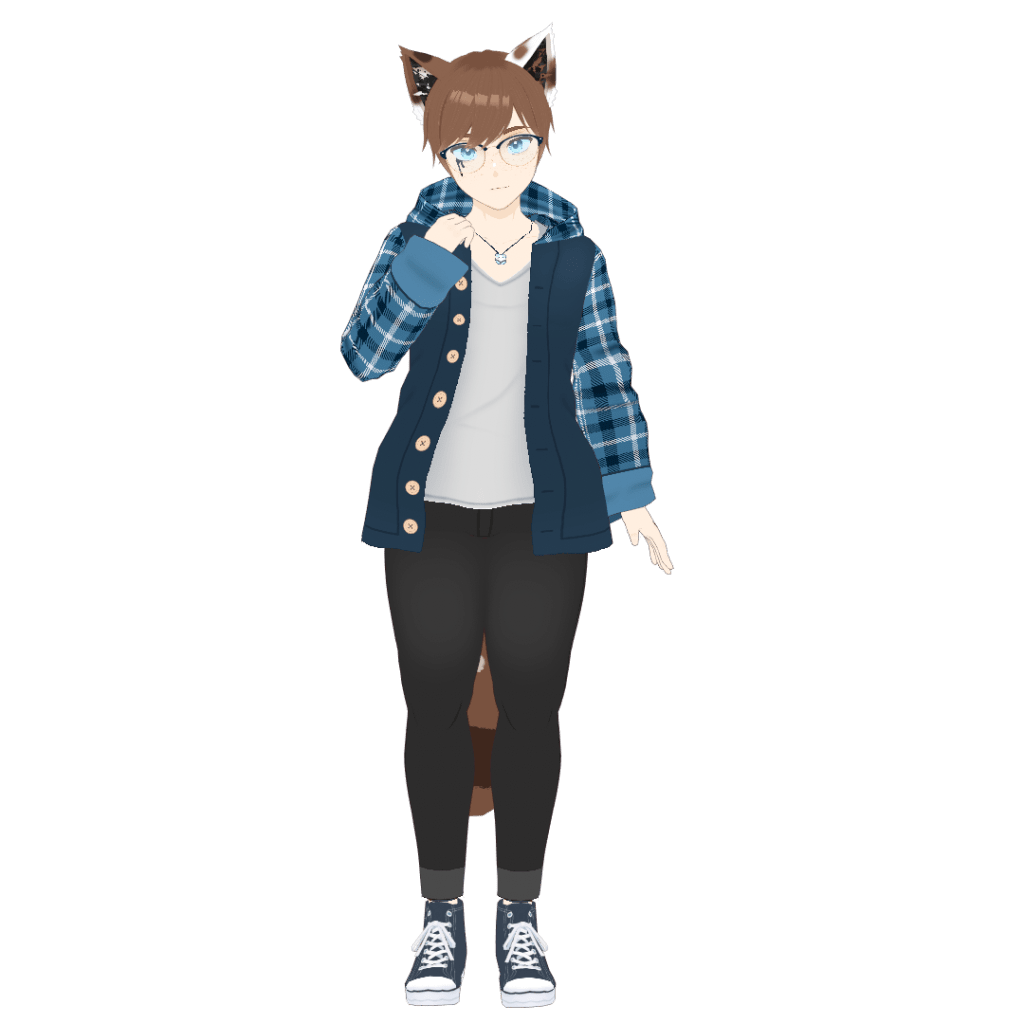
One of the parts of character design that I struggle with the most is clothing, and it honestly made it so difficult to finish this model. I made multiple outfit sketches after making the base and draft textures for my model, but none of them really stood out to me. Either that, or I thought they looked good when I drew them and then realized I didn’t when I came back to them later. However, this is something I am actively working on by considering what kinds of clothes I like in real life. Since my model is supposed to be a reflection of me, I figured that getting to know my personal sense of style would help me with this.
I’m happy to say that I recently ended up designing a summer outfit that you can check out in my recent WIP Wednesday post. However, working more on that will probably have to wait for when I have more free time.
Thank you so much for checking out this little post. If you enjoyed reading it, please consider giving this post a like and If you have any questions about my model-making process or how I do the things that I do, leave a comment down below and I will try to answer as many questions as I can. (Maybe they’ll become their own posts in the future or I’ll make a tutorial!) Also, I currently have a waitlist open for my commissions. I plan on starting them again in June (I’ll have plenty of time because I’ll probably be job hunting), so if you are interested in a model from me, send me a message and I’ll add you to the queue.
Anyway, good luck in your creative endeavors!


Leave a comment